It really seems like the kitchen has some doozies for deep cleaning, with all of the appliances! Don't forget to clean out at least one set of cupboards today. You can check yesterday's post HERE for the how-to. You'll not have a problem joining in and catching up today!
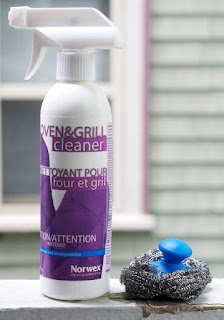
Here's what I'll be using to clean the oven:
- Oven & Grill Cleaner
- Mighty Mesh Pot Scrubber or Spirinett - for the inside of the oven
- Sirisponge - for the enamel stovetop
- Ultra Power Plus Laundry Detergent
- Kitchen Scrub Cloth
- To use the Oven & Grill Cleaner, you warm the oven up, turn it off and then spray it all over the inside. I shut the oven at this point and went on to clean the other parts of the stove.
- Take all the stove top pans and burners off.
- Fill the kitchen sink with hot water and 1 teaspoon of Ultra Power Plus Laundry Detergent and put the burners in to soak. (yes you read that right! The Laundry Detergent works wonders on grease!)
- Take off the stove top if you are able. All parts of the stove will come off fairly easily. If you have an electric stove, you can unplug the electrical parts to get the top off. Here's what that looks like.
- This is the after picture. This part of my stove was just disgusting and burned on! First, I sprayed some of that Oven & Grill Cleaner on there to loosen it up. Then I used my Spirosponge to scrub away. This did take some work, but It was well worth it!
- Next, (Oven was still soaking) I took the fan cover off, and discovered that there wasn't even a lightbulb in there! After wiping up inside the fan area down with the Spirosponge, I replaced the lightbulb.
- Meanwhile, I filled the other side of my kitchen sink with the UPP Laundry Detergent and put the fan cover in there to soak. I literally, just had to wipe off a couple of spots on the edges to get this looking like new! I love not having to scrub!
 |
| This is the same fan cover! I didn't realize that I didn't have it turned the same way! |
- At this point, I went back to those soaking pan covers, wiped them down and used the Spirinett to clean those pans. It does scratch those pans while cleaning, but I really just wanted them to look clean and shiny. If you worry about the scratching, use the Spirisponge instead. Just an fyi, DO NOT use the Spirinett on the enamel paint of the stove top! It will remove the enamel. That's why my stove top looks dirty! My hubby was helping out one day and cleaned my stove top with the Spirinett and took off the paint!! Don't do it!
- The oven door comes off, so you can access it easier. Just pull up at an angle. It may take more than one person to put it back, but so worth it to clean the oven out. Now it's time to scrub and clean that inside. A few places, I had to reapply the Oven & Grill Cleaner to really get off those burned in places, but it was so much better than all the chemicals I usually have used!
- Clean out the drawer. Apparently this is supposed to be a warming drawer? I use it for my pot lid storage, so I found that all my lids needed a good cleaning.
- Pull the stove out, clean the wall and floor underneath. The Superior Mop System works wonderful and fast on the both the walls and the floor! Love it.
When I was in the oven, Mr. Right found that the light wasn't working inside the oven. When he checked it, it wasn't screwed in all the way! We were so excited to not have to replace that.
There you have it, I clean oven and surrounding area. Stay tuned for more Green Deep Cleaning Your House!


Comments
Post a Comment
Thanks so much for your comments! I love to hear from you!